A great bottle of chocolate whiskey is one of the most versatile spirits you can have on your bar cart. It’s fantastic for sipping on its own, but its true potential shines when you start mixing. From rich, creamy dessert martinis to sophisticated, spirit-forward twists on an Old Fashioned, the possibilities are endless. This guide is here to give you all the inspiration you need. We’ll explore different recipes and techniques that will help you master how to make a chocolate whiskey drink for any mood or occasion. Get ready to move beyond the basics and discover just how creative you can get with this incredible flavor combination.
Key Takeaways
- Infuse with Cacao Nibs for a Cleaner Flavor: For a clear, professional-quality chocolate whiskey, choose cacao nibs over chocolate bars. This method imparts a pure, deep chocolate taste without the extra fats and sugars that can make your spirit cloudy.
- Match Your Whiskey to Your Chocolate: The whiskey you choose is the foundation of your drink. As a general rule, pair a sweeter, smoother bourbon with lighter chocolate notes and a spicier rye to stand up to the intensity of dark chocolate.
- Balance Your Cocktail to Taste: A great drink is all about balance. If your creation is too bitter, stir in a small amount of simple syrup. If it’s too sweet, a dash of bitters or a little more whiskey can create the perfect harmony for your palate.
Your Chocolate Whiskey Shopping List
Ready to create your own chocolate whiskey? The good news is, you don’t need a long, complicated list of ingredients. Making a delicious infusion at home is surprisingly simple and gives you complete control over the final flavor. Whether you’re aiming for a subtle hint of cocoa or a rich, dessert-like spirit, it all starts with a few key items. Let’s walk through the essentials and a few fun extras to get you started on your first batch. Think of this as your go-to guide for building the perfect chocolate whiskey, tailored exactly to your taste.
The Basics: Whiskey and Chocolate
At its heart, making chocolate-infused whiskey only requires two things: your favorite whiskey and a source of chocolate flavor. That’s it. You can easily make chocolate-infused whiskey at home with just these two ingredients, a glass jar, and a little bit of patience. The beauty of this process is its simplicity. You don’t need any special equipment or bartending skills to get started. The key is to begin with a good quality whiskey that you already enjoy drinking on its own. This will serve as the perfect canvas for the rich, complex flavors of chocolate you’re about to add.
Choosing Your Chocolate
While you might be tempted to grab a chocolate bar, using cacao nibs is the secret to a clear, clean infusion. Cacao nibs are simply crushed, roasted cocoa beans, and they impart a deep, pure chocolate flavor without adding the extra fats or sugars found in processed chocolate. This prevents your whiskey from becoming cloudy or oily. If you do decide to experiment with solid chocolate, a good rule of thumb is to match intensities. Pair lighter, smoother whiskeys with milk chocolate, and let a bold rye or bourbon stand up to a high-cacao dark chocolate to create a balanced flavor profile.
Optional Flavor Boosts
Once you’ve mastered the basic infusion, you can start playing with other flavors to create a truly custom spirit. If you find your finished whiskey isn’t quite sweet enough, you can easily stir in a small amount of simple syrup to taste. For more complexity, consider adding other ingredients to your infusion. A split vanilla bean can add a creamy sweetness, a cinnamon stick brings a touch of warmth, and a pinch of chili flakes can introduce a surprising, pleasant heat. Experimenting is part of the fun, but it helps to be aware of some common infusion mistakes to get the best results.
How to Infuse Whiskey with Chocolate
If you love a good DIY project, making your own chocolate-infused whiskey is a fun way to spend an afternoon. The process is pretty simple and gives you total control over the final flavor. You can create a custom spirit that’s perfect for sipping or mixing into cocktails. The two most popular methods involve using either cacao nibs for a pure, deep flavor or dark chocolate for a sweeter, more decadent result.
Each method has its own quirks and gives you a slightly different outcome. Cacao nibs will give you a cleaner, more intense dark chocolate note, while using a chocolate bar introduces sugars and fats that change the texture. Whichever path you choose, the key is patience. A good infusion takes time, and you’ll need to taste it along the way to get it just right. It’s a rewarding process, but it definitely requires a bit of attention to detail to get a delicious, well-balanced result.
Infusing with Cacao Nibs
For the most authentic and straightforward chocolate flavor, cacao nibs are your best friend. Cacao nibs are small pieces of crushed, roasted cacao beans—basically, chocolate in its purest form before sugar and milk are added. Using them allows you to make chocolate-infused whiskey at home that has a deep, rich, and slightly bitter dark chocolate character without any extra sweetness or oils.
The process is simple: combine your whiskey and cacao nibs in a clean glass jar, seal it tightly, and give it a good shake. Let it sit in a cool, dark place for a few days, shaking it once a day. Start tasting it after day three to see how the flavor is developing. Once it reaches your desired intensity, strain out the nibs using a fine-mesh sieve and a coffee filter to catch any small particles.
Using Dark Chocolate
If you have a quality dark chocolate bar on hand, you can absolutely use it for an infusion. This method tends to create a sweeter, more dessert-like whiskey. However, it’s important to know that using chocolate bars or chips introduces cocoa butter and sugar into your whiskey. These additions can alter the flavor profile and give the final product a slightly cloudy appearance or an oily mouthfeel.
To do it, break up the chocolate and add it to your whiskey in a sealed jar. The infusion time is often shorter than with cacao nibs, so start tasting it after a day or two. Because of the added fats, you’ll need to be extra thorough when straining. You might even want to chill the infusion in the freezer for a bit, which will cause the fats to solidify on top, making them easier to skim off before you do a final strain.
Infusion Tips and Common Mistakes
To get the best results from your infusion, a few simple rules can make all the difference. First, make sure your jar is perfectly clean. Any leftover soap or food smells will find their way into your whiskey, and nobody wants that. It’s also a good idea to start with a small batch to perfect your ratio and timing before committing a whole bottle.
Some common mistakes people make include letting the infusion steep for too long, which can result in a bitter flavor, especially with cacao nibs. Another is not straining well enough, leaving you with sediment at the bottom of your bottle. Use a coffee filter or multiple layers of cheesecloth for a crystal-clear final product. Finally, store your finished infusion in a sealed bottle away from direct sunlight to preserve its flavor.
What’s the Best Whiskey for Chocolate Infusions?
Now that you have your chocolate, it’s time to pick its partner. The whiskey you choose is the backbone of your drink, and the right one will make your chocolate infusion sing. While you can technically use any whiskey you have on hand, being a little more intentional with your selection can make a huge difference in the final flavor. Think of it less as a strict rule and more as a fun pairing experiment. Let’s look at a few options to help you find the perfect match for your chocolate creation.
Bourbon vs. Rye: Which to Choose?
The great debate: bourbon or rye? Both are fantastic choices, but they bring different things to the table. Bourbon tends to be sweeter, with notes of vanilla, oak, and caramel that play beautifully with the creaminess of milk chocolate. If you’re aiming for a smooth, mellow, and dessert-like drink, bourbon is a reliable friend.
Rye, on the other hand, is bourbon’s spicier cousin. It typically has a peppery kick and a drier finish. This boldness allows it to stand up to the intensity of dark chocolate with a high cacao percentage. A good rule of thumb is to match intensity. For more ideas on pairings, check out our complete chocolate whiskey drinks guide.
The Perfect Shortcut: Mash & Mallow S’mores Whiskey
If you want to skip the guesswork and get straight to a delicious drink, we made Mash & Mallow S’mores Whiskey for exactly this moment. It’s crafted with the classic campfire flavors of toasted marshmallow, rich chocolate, and graham cracker already built-in, so it’s designed to blend perfectly with even more chocolate. It takes all the complexity of pairing and simplifies it. For an incredibly easy and impressive cocktail, just shake 1 ounce of Mash & Mallow with 2 ounces of chocolate liqueur and 1 ounce of cream over ice. You can buy a bottle online and have it ready for your next creation.
Why Whiskey Quality Matters
Regardless of whether you choose bourbon, rye, or a flavored option, quality is key. This doesn’t mean you need to grab the most expensive bottle on the shelf, but you should choose a whiskey you’d enjoy sipping on its own. A well-made whiskey will have complex flavors that add depth to your infusion rather than just a harsh alcohol burn. When a spirit already has notes of vanilla, caramel, or spice, it gives your chocolate infusion a head start, creating a more harmonious and layered final drink. Starting with a solid foundation ensures your finished cocktail is smooth, balanced, and truly enjoyable.
Mixing Your First Chocolate Whiskey Drink
Ready to mix up something delicious? Making a fantastic chocolate whiskey cocktail is way easier than you might think. You don’t need a long list of complicated ingredients or fancy bar tools to get started. The key is to focus on good-quality components and a few simple techniques. Whether you’re winding down after a long week or mixing drinks for friends, these tips will help you craft a perfectly balanced and decadent drink every time. Let’s get started with a simple recipe that will become your new go-to.
A Simple Step-by-Step Guide
Let’s start with a classic, creamy chocolate whiskey drink that’s practically foolproof. All you need are three simple ingredients to create something truly special. Grab a cocktail shaker and fill it with ice. Add 2 ounces of your favorite chocolate liqueur, 1 ounce of cream (or half-and-half), and, of course, 1 ounce of Mash & Mallow S’mores Whiskey. The built-in notes of chocolate, marshmallow, and graham cracker in our whiskey do most of the heavy lifting for you. Secure the lid and shake everything vigorously for about 15 seconds. You’ll know it’s ready when the shaker feels frosty. Strain it into a chilled glass, and you’re done.
Getting the Ratios Right
The secret to a great cocktail is balance. While our simple recipe is a fantastic starting point, feel free to make it your own. The 2:1:1 ratio (chocolate liqueur:cream:whiskey) creates a rich, dessert-like drink, but your personal taste is what matters most. If you prefer a more spirit-forward cocktail, try increasing the whiskey to 1.5 ounces. If you want it less sweet, pull back a little on the chocolate liqueur. The best way to find your perfect mix is to experiment. Start with the base recipe and adjust one ingredient at a time until you create a drink that’s just right for you.
Shaken or Stirred? Serving Your Drink
You’ve probably heard bartenders debate whether to shake or stir a cocktail. For a chocolate whiskey drink like this one, shaking is the only way to go. Why? Because it contains ingredients with different densities, like cream and liqueur. Shaking vigorously doesn’t just chill the drink; it also emulsifies the cream and properly integrates all the flavors, giving your cocktail a smooth, velvety texture. A general rule of thumb is to shake any cocktail that includes juice, cream, or egg whites. You can find more inspiration for other delicious shaken and stirred cocktails on our recipe page.
Chocolate Whiskey Cocktail Recipes to Try
Once you’ve made your chocolate-infused whiskey or grabbed a bottle of Mash & Mallow, you’re ready for the best part: mixing drinks. A great chocolate whiskey is fantastic on its own, but it also serves as an incredible base for a wide range of cocktails. Whether you’re in the mood for a sophisticated twist on a classic or a full-on dessert in a glass, there’s a recipe waiting for you. Let’s get shaking (and stirring).
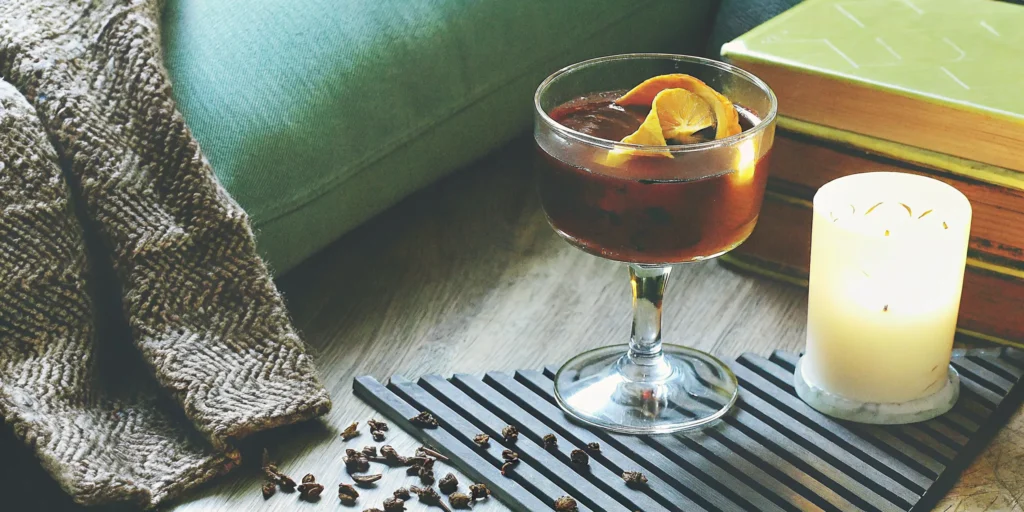
The Chocolate Old Fashioned
The Old Fashioned is a timeless classic, and adding a chocolatey spin makes it even better. This version is rich, complex, and surprisingly easy to make. In a rocks glass, gently muddle an orange slice and a cherry with a dash of bitters to release their flavors. Add a large ice cube, then pour in two ounces of your chocolate whiskey. Give it a gentle stir to combine everything, and you’ve got a sophisticated drink that’s perfect for sipping slowly.
The Mash & Mallow S’mores Martini
If you’re looking for a fun, indulgent cocktail, this S’mores Martini is a must-try. It’s creamy, sweet, and tastes just like your favorite campfire treat. All you need is a cocktail shaker filled with ice. Add two ounces of chocolate liqueur, one ounce of cream, and one ounce of our very own Mash & Mallow S’mores Whiskey. Shake it well until the outside of the shaker is frosty, then strain it into a chilled martini glass. For an extra touch, you can garnish the rim with crushed graham crackers.
Twists on the Classics: Whiskey Sour & Manhattan
Don’t be afraid to get creative and use your chocolate whiskey in other classic cocktails. Swapping it in for regular whiskey in drinks like a Whiskey Sour or a Manhattan adds a wonderful layer of richness and complexity. A Chocolate Whiskey Sour gets a beautiful balance from the sweet chocolate and tart lemon. You can find tons of cocktail inspiration online, but the best approach is to simply start with your favorite recipe and make the swap. It’s a simple way to put a personal touch on a beloved drink.
Decadent Drinks: Mudslides and Milkshakes
Sometimes you just want a drink that feels like a total treat, and that’s where chocolate whiskey truly shines. Use it to create boozy versions of your favorite decadent drinks. Blend it with ice cream, milk, and chocolate syrup for an adult milkshake that will blow you away. Or, mix it into a Mudslide with coffee liqueur and Irish cream for an ultra-rich, creamy cocktail. These drinks are perfect for dessert or for any time you’re craving something sweet, boozy, and incredibly satisfying.
Perfecting Your Chocolate Whiskey Creation
Once you’ve got the basics down, the real fun begins. This is where you get to play bartender and tweak your drink until it’s absolutely perfect for your palate. It’s all about fine-tuning the balance, adjusting the sweetness, and adding those final touches that make a good drink a great one. Think of it as adding your own signature to the recipe. Let’s get into how you can customize your chocolate whiskey creation to make it uniquely yours.
Balancing Sweet and Spirit
This is where the magic happens. A great chocolate whiskey drink isn’t just sweet; it has depth. The key is finding a beautiful harmony between the rich chocolate notes and the warm, complex character of the whiskey. If you’re making your own infusion, you can get a head start by choosing a whiskey that already has complementary flavors like vanilla or caramel. This creates a more cohesive and layered taste. Of course, if you’re using Mash & Mallow S’mores Whiskey, we’ve already done the balancing for you, giving you a perfect foundation of toasted marshmallow, chocolate, and smooth whiskey to build upon.
Adjusting for Sweetness
Everyone’s definition of “the perfect sweetness” is a little different. If you’ve made your own infusion and find it’s not quite sweet enough, the fix is simple. After you strain out the cacao nibs, stir in a bit of simple syrup. You can use a classic white sugar syrup or experiment with brown sugar or agave syrup to add different notes of caramel or earthiness. Start with a small amount, taste, and add more until it’s just right. When you’re mixing with Mash & Mallow, you may find you need less sweetener in your cocktail recipes, so always taste as you go!
Garnishes and Flavor Pairings
The right garnish is more than just decoration—it adds to the aroma and overall experience of the drink. A general rule of thumb is to pair lighter, sweeter whiskeys with milk chocolate and more robust rye whiskeys with intense dark chocolate. For a drink made with our S’mores Whiskey, why not lean into the theme? A toasted marshmallow, a graham cracker-dusted rim, or a curl of dark chocolate can make your cocktail feel extra special. Don’t be afraid to experiment with classic pairings, either. An orange peel can add a bright, citrusy contrast that cuts through the richness beautifully. These flavors work wonderfully in a variety of cocktails.
How to Serve and Store Your Infused Whiskey
You’ve put in the time to create a delicious chocolate-infused whiskey, so don’t stop short of the finish line. The way you serve and store your creation makes all the difference, turning a good drink into a great one. Proper storage keeps your whiskey tasting its best, while the right presentation sets the mood for every sip. From the glass you choose to the snacks you serve alongside it, these details help you get the most out of your homemade spirit. Let’s walk through how to give your chocolate whiskey the treatment it deserves.
Choosing the Right Glassware
The right glass does more than just hold your drink—it enhances the entire experience. For a chocolate whiskey, you can’t go wrong with classic cocktail glassware. If you’re sipping it neat or on the rocks, a heavy-bottomed rocks glass (or Old Fashioned glass) feels substantial in your hand and gives the spirit room to breathe. If you’ve mixed your infusion into a classic cocktail like a Manhattan, a coupe or Nick & Nora glass adds a touch of elegance. You don’t need a cabinet full of different glasses; a simple, beautiful rocks glass is a versatile choice for almost any whiskey drink.
How to Store Your Infusion
Proper storage is key to preserving the flavor of your chocolate whiskey. After you’ve strained out the solids, pour the finished infusion into a clean, airtight glass bottle or jar. Store it in a cool, dark place, like a pantry or cabinet, away from direct sunlight. If you added any sugar, simple syrup, or used high-fat ingredients like a chocolate bar, it’s best to keep it in the refrigerator. An infusion made with just cacao nibs can last for six months or even longer, while one with richer ingredients is best enjoyed within a few weeks. A quick taste will always tell you if it’s still good to go.
Delicious Food Pairings
A great drink is even better with the right snack. The rich notes of your chocolate whiskey open up a world of delicious food pairings. For a simple match, try serving it alongside high-quality dark chocolate. If you want to play with contrasting flavors, a small bowl of salted nuts or a platter of aged cheddar and figs works beautifully. For the ultimate decadent experience, lean into the s’mores theme and pair your drink with graham crackers and toasted marshmallows for a fun, nostalgic treat. Exploring different food and whiskey pairings is a great way to discover new flavor combinations.
Troubleshooting Your Chocolate Whiskey
So, you’ve made your first batch of chocolate-infused whiskey, but something’s a little off. Don’t worry! Like any good recipe, homemade infusions can take a bit of practice. A few simple adjustments can usually fix any issues with flavor, texture, or consistency. Think of it less as a failure and more as a custom calibration. Whether your creation is a bit too bitter for your liking or the texture isn’t quite right, there’s almost always a solution.
The good news is that most common problems are easy to solve. We’ll walk through how to balance the flavor if it’s too sweet or bitter, what to do about texture issues, and how to sidestep the most frequent mistakes people make when infusing spirits at home. With a few simple tweaks, you can get your infusion back on track and ready for sipping or mixing into a delicious cocktail. And if you ever want to skip the trial and error, you can always grab a bottle of Mash & Mallow S’mores Whiskey for a perfectly balanced drink every time.
Too Bitter or Too Sweet? Here’s the Fix
If you take a sip and find your whiskey is more bitter than you’d like, it probably means the cacao nibs or dark chocolate steeped a little too long. It’s an easy fix. The best way to balance the flavors is by stirring in a small amount of simple syrup. Start with just a quarter of an ounce, stir, and taste. Keep adding tiny amounts until the bitterness mellows out. On the flip side, if your infusion is too sweet, you can add a bit more whiskey to dilute the sugar. Another great trick is to add a dash or two of aromatic or orange bitters to give it more complexity and cut through the sweetness.
Solving Texture and Consistency Problems
A great infusion should be smooth, not cloudy or gritty. If you’re noticing an off-texture or a strange aftertaste, the culprit might be your container. It’s essential to use jars that are perfectly clean, as any lingering food or soap residue can completely alter the final product. Before you start, give your infusion jar a thorough wash with hot, soapy water and rinse it well. For a perfectly clear spirit, make sure you strain it properly. Using a fine-mesh sieve lined with cheesecloth will catch any tiny chocolate particles, giving you a beautifully smooth and professional-quality chocolate-infused whiskey.
How to Avoid Common Mistakes
Learning from a few common missteps can save you a lot of time and ingredients. One of the biggest DIY infusion mistakes is making too large a batch on your first try. Start small until you’ve perfected your recipe. Other frequent errors include steeping the chocolate for too long, not straining the mixture well enough, and storing it in a warm or sunny spot, which can degrade the flavor. When you’re ready to mix a drink, be mindful of other details. Ruining your whiskey cocktails can happen by adding too much syrup or using the wrong type of ice, which can over-dilute your carefully crafted spirit.
Related Articles
- 11 Decadent Chocolate Whiskey Drinks to Try
- A Guide to Whiskey with Chocolate Notes
- 5 Best Chocolate Flavored Whiskeys to Try
- The 7 Best Chocolate Whiskeys to Sip & Savor
- What to Mix with Chocolate Whiskey: 10 Best Ideas
Frequently Asked Questions
How long should I let my chocolate whiskey infuse? The ideal infusion time really comes down to your personal taste. If you’re using cacao nibs, start tasting your whiskey after about three days. It might be perfect then, or it could need another day or two to develop a richer flavor. If you’re using a chocolate bar, the process is much faster, so you’ll want to start tasting it after just one day. The most important thing is to taste it daily until it reaches a flavor intensity that you love.
If I use Mash & Mallow S’mores Whiskey, do I still need to add chocolate liqueur to my cocktails? Not at all! Our S’mores Whiskey is crafted to deliver a complete flavor profile of chocolate, toasted marshmallow, and graham cracker all on its own. You can use it as a direct, flavorful substitute for standard whiskey in your favorite recipes. Of course, if you’re aiming for an extra-decadent, dessert-style drink, adding a splash of chocolate liqueur will certainly amplify that rich cocoa note.
Why did my homemade infusion turn out cloudy? A cloudy or slightly oily result almost always happens when you use a solid chocolate bar for your infusion. This is because chocolate bars contain cocoa butter and other fats that don’t fully dissolve in the alcohol. To fix this, you can chill the finished infusion in the freezer for a short time. The fats will solidify at the top, making them easy to skim off before you give the whiskey a final strain for a clearer result.
Can I use other types of whiskey besides bourbon or rye? Absolutely. While bourbon and rye are fantastic starting points because of their complementary sweet and spicy notes, feel free to experiment with a spirit you already enjoy. A smooth Irish whiskey would create a wonderfully mellow infusion, while a smoky Scotch could add a complex, campfire-like dimension to the chocolate. The best infusions always start with a good quality whiskey that you like drinking by itself.
How should I store my homemade chocolate whiskey, and how long will it last? Once your infusion is strained and bottled, store it in a cool, dark place like a cabinet. If you made a straightforward infusion with just cacao nibs, it will last for six months or even longer. If you added any sugar, simple syrup, or used a chocolate bar, it’s best to keep it in the refrigerator and enjoy it within a few weeks to ensure it stays fresh.
