If your camping beverage plan usually starts and ends with a cooler full of beer, it’s time for an upgrade. The idea of mixing cocktails in the woods might sound like a lot of work, but it’s not. The secret is embracing make-ahead cocktails. By mixing your drinks before you go, you get easy-to-transport cocktails perfect for getting the night started, saving space and cleanup. I’ll show you how to create the best premixed light cocktails for a picnic and other pre-drink cocktails that chill fast and serve easily. We’re aiming to improve on the best beverages for camping and picnics; Coca-Cola is a fine start, but we can do so much better.
Key Takeaways
- Batch Your Cocktails Before You Go: The best way to enjoy drinks at the campsite is to do the work at home. Mix your spirits, juices, and syrups into a single container so all you have to do later is pour and enjoy.
- Choose Your Containers Wisely: Leave the glass at home and opt for durable, leak-proof options. An insulated thermos will keep your pre-mixed drinks perfectly chilled, while a lightweight flask saves precious pack space.
- Plan a Simple, Crowd-Pleasing Menu: Stick to two or three easy recipes that use some of the same ingredients. This lightens your load and ensures you can make a great drink for everyone without packing your entire bar.
Why Batch Cocktails Will Change Your Camping Game
Let’s be honest: after a long day of hiking or setting up a tent, the last thing you want to do is play bartender. Fumbling with a full cocktail set, multiple bottles, and sticky mixers at a dusty picnic table isn’t exactly relaxing. This is where batching your cocktails before you even leave home changes the game. Pre-mixing your drinks means you do the work in the comfort of your kitchen, so you can spend more time enjoying the campfire.
The beauty of batch cocktails is their simplicity. Instead of packing a whole bar, you just need one or two large, sealed containers. When you’re ready for a drink, you simply pour it over ice and enjoy. This approach not only saves you precious packing space but also cuts down on cleanup. It’s about creating an elevated cocktail experience without the backcountry hassle, allowing you to sip on something special like a S’mores Old Fashioned instead of just another warm beer.
Making drinks ahead of time is also perfect for groups. You can prepare a large pitcher or bottle that’s ready to share as soon as you arrive. It’s a great way to get the good times rolling without anyone being stuck on drink duty. Plus, it’s flexible. You can mix a base spirit like our S’mores Whiskey with a few key ingredients, then let everyone customize their own drink with a splash of soda or ginger ale. It’s all the fun and flavor, with none of the fuss.
Pack the Perfect Camping Cocktail Kit
Enjoying a delicious cocktail by the campfire doesn’t mean you have to haul your entire home bar into the woods. The secret is packing smart with a few versatile items that do double duty. A well-planned cocktail kit is lightweight, efficient, and has everything you need to mix your favorite drinks under the stars. Forget the clunky, single-use gadgets; we’re focusing on durable, multi-purpose essentials that make campsite bartending a breeze. From the right tools for mixing to the best containers for transport, here’s how to build the perfect camping cocktail kit.
Your Essential Gear Checklist
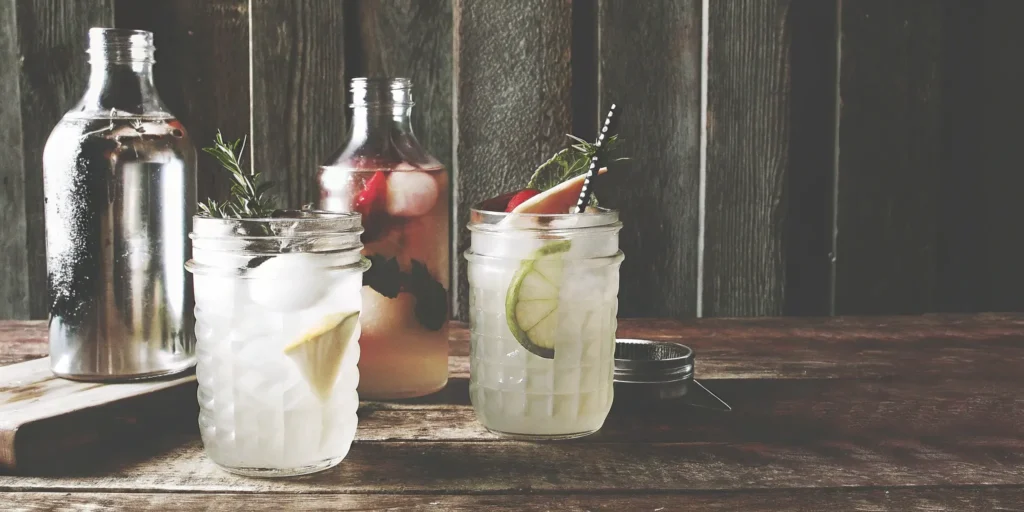
You can leave the fancy crystal shaker at home. One of the best items you can pack is a large mason jar with a secure lid; it works perfectly as a cocktail shaker and can also be used for measuring or even as a drinking glass. Add a small, flexible cutting board and a paring knife for slicing citrus or other garnishes. For accurate pours, a simple jigger or even a set of measuring spoons will do the trick. Finally, pack a few durable, reusable cups—enamel or stainless steel tumblers are great because they’re nearly indestructible and help keep your drinks cool. This minimalist camping gear setup gives you everything you need without weighing down your pack.
Choosing the Best Trail-Ready Ingredients
Your camping cocktail menu starts with a great base, and nothing says “campfire” quite like our S’mores Whiskey. For mixers, think shelf-stable and easy to pack. Canned sodas, tonic water, and small containers of juice are perfect. Instead of packing delicate herbs, bring whole citrus fruits like lemons and limes, which travel well and add a fresh kick to any drink. To save yourself some work at the campsite, you can also prepare ingredients like simple syrup at home. Just make a batch, let it cool, and pour it into a small, leak-proof bottle. This little bit of prep makes mixing drinks by the fire quick and effortless.
Pack Lighter with Cans and Minis
Big, heavy glass bottles are the enemy of efficient packing. They’re bulky, breakable, and take up way too much space. Instead, think smaller. Decant your favorite spirits into smaller, trail-friendly flasks or bottles. If you’re bringing other drinks, look for canned wines or pre-made cocktails, which are lighter and crush down for easy packing out. This strategy not only lightens your load but also lets you bring a greater variety of drinks without sacrificing space. It’s one of the simplest tips for camping cocktails, allowing you to have options without hauling your entire liquor cabinet into the wilderness.
Free Up Cooler Space with Room-Temperature Sips
Cooler space is prime real estate on any camping trip, and it shouldn’t be wasted on drinks that don’t need to be ice-cold. Free up that valuable room for food by choosing spirits that are just as delicious at ambient temperature. A whiskey with warm, rich flavors is the perfect candidate. Our Mash & Mallow S’mores Whiskey, with its notes of toasted marshmallow and chocolate, is designed to be enjoyed neat right by the fire—no ice required. You can also use it to create incredible warm drinks, like spiking your evening hot chocolate for a grown-up treat. This simple shift in planning ensures your food stays fresh and you still get to enjoy a fantastic fireside drink.
The Best Containers for Easy-to-Transport Cocktails
Getting your pre-mixed cocktails to the campsite without leaks or breakage is crucial. My number one rule: avoid glass bottles whenever possible. They’re heavy and can easily break on a rocky trail. Instead, transfer your batched cocktails into more durable containers. An insulated thermos is an excellent choice because it’s tough and will keep your drinks perfectly chilled for hours. Sturdy, BPA-free plastic bottles are another great, lightweight option. Investing in a few quality reusable bottles not only protects your precious cargo but also makes serving as simple as unscrewing a cap and pouring.
Getting Your Cocktails to Camp, Safe and Sound
You’ve hiked the trail, pitched the tent, and started the fire. The last thing you want is to reach for your pre-made cocktail only to find it’s lukewarm, watered down, or—worst of all—spilled all over your backpack. A little planning goes a long way in making sure your fireside drinks are as delicious as they would be at home. Transporting cocktails isn’t just about throwing them in a bag and hoping for the best; it’s about preserving the quality and flavor you worked to create. Getting your
How to Keep Your Drinks Cold on the Go
Nothing ruins a great cocktail faster than a melted ice cube. To keep your drinks cold without diluting them, skip the plastic water bottle and invest in a good quality insulated container. As one camper wisely put it, “I’d recommend an insulated thermos or something over a bottle. Hydroflask thermoses keep liquid remarkably cold for a long time.” For best results, pre-chill your thermos by filling it with ice water for about 10 minutes before you pour your batched cocktail in. You can also use large, slow-melting ice cubes or even frozen fruit to keep things cool on the journey. This way, your drink will be perfectly chilled and full-strength when you arrive.
Keeping Your Cocktails Fresh Until the Last Sip
The key to a fresh-tasting cocktail is an airtight seal. This prevents both messy leaks and oxidation, which can make your drink taste flat. A large mason jar with a secure lid is one of the best items you can pack; it works perfectly as a cocktail shaker and can also be used for storage or even as a rustic drinking glass. Other great options include swing-top glass bottles or any sturdy, reusable bottle with a screw-on cap that you can trust. Just make sure your container is completely clean before you fill it to avoid any unwanted flavors. A secure container ensures your cocktail tastes just as good by the campfire as it did when you first mixed it.
Mix Now or Mix Later? A Quick Guide
The secret to a great make-ahead cocktail is knowing which ingredients to combine in advance. As a general rule, you should mix all the non-carbonated components—like your Mash & Mallow S’mores Whiskey, juices, syrups, and bitters. You can prepare a batch or two ahead of time and store them in a sealable pitcher or bottle. Then, once you’re settled at the campsite, you can add the finishing touches. This means packing any bubbly mixers, like soda water, ginger beer, or sparkling wine, separately and adding them right before you serve. The same goes for fresh garnishes like citrus wedges or mint sprigs. This simple step keeps your cocktails tasting fresh and fizzy.
12 Easy Make-Ahead Cocktails for Camping
Once you have your gear sorted, it’s time for the fun part: planning the drinks. The key to a great camping cocktail is simplicity. You want something that requires just a few ingredients and no special bar tools. The best approach is to mix as much as you can at home so all you have to do at the campsite is pour, maybe add a splash of soda, and enjoy.
Here are 12 easy, batch-able cocktail ideas to get you started. Each one is designed for minimal fuss and maximum flavor, perfect for sipping by the fire.
Campfire-Ready S’mores Whiskey Cocktails
Nothing says “campfire” quite like s’mores, so let’s start with cocktails that feature that classic flavor. Using Mash & Mallow S’mores Whiskey as your base means the chocolate, marshmallow, and graham cracker notes are already built-in, saving you from packing extra ingredients.
- S’mores Old Fashioned: At home, combine your whiskey, a dash of bitters, and a little brown sugar simple syrup in a flask. At the campsite, just pour over ice. Garnish with an orange peel if you’re feeling fancy.
- Campfire Cold Brew: Mix equal parts Mash & Mallow and your favorite cold brew concentrate in a bottle. When you’re ready for a drink, pour it over ice and top with a splash of water or oat milk.
- Toasted S’mores Sipper: This one is as easy as it gets. Simply pour Mash & Mallow over a large ice cube and enjoy. It’s a delicious, no-prep drink that lets the s’mores flavor shine.
Refreshing Citrus Cocktails for the Trail
When you’re spending time in the sun, a bright, citrusy drink is incredibly refreshing. These recipes are perfect for batching in a large pitcher or bottle before you even leave the house. This way, you only have to pack one container instead of a bunch of separate ingredients.
- Whiskey Palmer: Before you go, brew a strong batch of black tea and let it cool. Mix it with lemonade and Mash & Mallow to taste. Store it in a large, sealed bottle in your cooler. Serve over ice.
- Bourbon Margarita: Squeeze fresh lime juice at home and mix it with Mash & Mallow and a touch of agave nectar. At camp, just shake with ice (a sealed water bottle works great for this!) and pour.
- Grapefruit Whiskey Sour: Combine Mash & Mallow, fresh grapefruit juice, and a little simple syrup in a bottle. When you’re ready to serve, pour over ice and top with a splash of sparkling water.
Effortless Berry & Fruit Cocktails
Fruit-based cocktails are always a crowd-pleaser, and they’re surprisingly easy to prep for a camping trip. Using fresh or frozen berries adds a pop of color and flavor that feels special, even when you’re miles from home.
- Campsite Sangria: This is one of the best make-ahead camping cocktails. At home, chop up apples, oranges, and berries, and place them in a large, leak-proof container. Pour a bottle of red wine and a generous amount of Mash & Mallow over the top. Let it chill and marinate. The best part? You get a boozy fruit salad at the end.
- Berry Whiskey Smash: Muddle some fresh berries (like raspberries or blackberries) with a bit of mint and simple syrup at the bottom of a large jar. Top with Mash & Mallow and lemon juice. At the campsite, give it a good shake and pour over ice.
- Spiked Peach Iced Tea: Similar to the Whiskey Palmer, but with a fruity twist. Brew peach-flavored tea, let it cool, and mix with Mash & Mallow. It’s a simple, delicious drink for a warm afternoon.
Modern Twists on Classic Campfire Drinks
You don’t need a full bar to create a memorable cocktail experience in the great outdoors. These recipes take familiar classics and give them a simple, camp-friendly twist that feels a little more thoughtful than just a basic mixer.
- The Woodsman’s Mule: Before your trip, mix Mash & Mallow with fresh lime juice. At the campsite, pour the mixture into a mug with ice and top with ginger beer. It’s a simple but satisfying classic.
- S’mores & Soda: For a super simple highball, just mix Mash & Mallow with your favorite soda. It works well with cola for a sweet, familiar flavor or with club soda to let the whiskey’s s’mores notes come through.
- Hot Toddy Kit: If you’re camping in cooler weather, a Hot Toddy is perfect. Pack a flask of Mash & Mallow, some honey sticks, and a few lemon wedges. At night, just add hot water from your kettle for a warming, comforting drink.
Classic & Simple Camping Cocktails
While batching cocktails is my favorite camping hack, sometimes you want to mix a drink on the fly. Keeping a few simple recipes in your back pocket means you’re always prepared. These classics require minimal ingredients and zero fuss, making them perfect for spontaneous fireside sipping or for when your pre-mixed stash runs dry sooner than expected. You don’t need a full bar kit to make something delicious; often, the best drinks are the most straightforward ones. From a zesty refresher to a surprisingly tasty two-ingredient mix, these recipes prove that simplicity is key when you’re enjoying the outdoors.
Ranch Water
If you haven’t tried Ranch Water yet, you’re in for a treat. It’s become a go-to for a reason: it’s incredibly simple and refreshing. All you need is tequila, a good squeeze of fresh lime juice, and a top-off of seltzer or sparkling water. It’s the perfect antidote to a warm day spent on the trail. For a slightly sweeter version, you can add a small splash of orange liqueur, but it’s fantastic on its own. This is one of those easy camping cocktails that tastes way more complex than it is, proving you don’t need a lot of ingredients to make a great drink.
Kalimotxo (Red Wine and Cola)
This one might sound a little strange, but trust me, it works. The Kalimotxo is a popular drink in Spain, and its beauty is in its simplicity. It’s just two ingredients: red wine and cola, mixed in equal parts. The best part for camping? You should absolutely use cheap red wine—anything under $10 is perfect. The sweetness and fizz of the cola balance out the tannins in the wine, creating a surprisingly delicious and easy-drinking cocktail. It’s a fantastic way to use up that bottle of red you weren’t sure what to do with.
Easy Vodka Mixers
Vodka is a great spirit to pack for camping because it’s so versatile. With just one bottle, you can cater to a few different tastes. A classic Vodka Tonic is always a crisp and refreshing choice, especially with a squeeze of lime. If you have cranberry juice on hand, you can easily mix up a Cape Codder. And of course, there’s the timeless Screwdriver, which is just vodka and orange juice. These simple combinations mean you can pack a few basic mixers and have several different drink options ready to go without any extra effort.
The Versatility of Cola Cocktails
Never underestimate the power of a can of cola. It’s one of the most reliable mixers out there, with a sweet, fizzy profile that pairs well with a wide range of spirits. The classic Whisky and Coke is a campfire staple for a reason—it’s simple, satisfying, and always hits the spot. For a fun twist, try it with our Mash & Mallow S’mores Whiskey; the cola brings out the vanilla and caramel notes beautifully. With so many cola cocktail recipes out there, it’s a mixer that offers endless possibilities for easy campsite drinks.
How Long Will My Batch Cocktails Last?
You’ve mixed up a big batch of delicious cocktails for your trip—now how long will they actually stay fresh? The short answer is: it depends entirely on the ingredients. The good news is that with the right storage, most batched cocktails will easily last the length of a weekend camping trip.
The key factor is whether your cocktail contains fresh ingredients, like citrus juice. Spirit-forward cocktails, like an Old Fashioned made with our S’mores Whiskey, are incredibly stable. Since alcohol is a natural preservative, a mix of just whiskey, bitters, and sugar can last for weeks, if not longer, when stored correctly. This makes them a perfect, low-maintenance option for any adventure.
If your recipe includes fresh juice, the clock starts ticking a bit faster. While the cocktail will still be perfectly safe to drink, the juice will begin to oxidize, and its bright, zesty flavor will start to fade after about two to three days. For the best taste, plan to enjoy any citrus-based cocktails earlier in your trip and be sure to keep them chilled in your cooler.
Proper storage is your secret weapon for freshness. Your best bet is to use completely airtight containers like mason jars with secure lids or high-quality, sealable pitchers. This minimizes air exposure, which keeps the flavors vibrant and prevents any unwanted leaks in your cooler. And one final tip: if your cocktail calls for a bubbly mixer like soda or tonic water, always pack that separately and add it just before serving to keep the fizz alive.
Beyond the Cocktail: Other Essential Camping Drinks
While a well-made cocktail is the star of the evening, a great camping trip is supported by a full cast of beverages. From the first cup of coffee in the morning to a warm nightcap by the fire, having the right drinks on hand makes the entire experience better. It’s not just about cocktails; it’s about staying warm, hydrated, and energized so you can enjoy every moment in the great outdoors. A thoughtful beverage plan covers all your bases, ensuring you have the perfect drink for any time of day. Here are the other essential drinks you shouldn’t leave home without.
Warm Drinks for Chilly Nights
As the sun sets and a chill settles into the air, there’s nothing better than wrapping your hands around a warm mug. A hot beverage is more than just a way to warm up; it’s a comforting ritual that signals the end of the day and the start of a relaxing evening by the fire. Whether you’re looking for a boozy warmer or a cozy, family-friendly treat, a simple hot drink can make a cold night feel magical. It’s an easy way to add a touch of comfort to your campsite and create a memorable moment under the stars.
Hot Alcoholic Options
When the temperature drops, a Hot Toddy is the perfect fireside companion. This classic warmer is incredibly easy to make at the campsite, especially when you have the right ingredients on hand. All you need is a flask of our S’mores Whiskey, some honey sticks, and a few lemon wedges. Simply heat up water in your kettle, combine everything in a mug, and you have a soothing, flavorful drink that will warm you from the inside out. It’s one of the simplest and most satisfying camping cocktails you can make.
Cozy Non-Alcoholic Mixes
Of course, you’ll want some warm, non-alcoholic options too. A rich hot chocolate is always a winner, and you can make it feel extra special by using high-quality cocoa powder and maybe even a splash of oat milk. Another great choice is spiced apple cider; just heat it over the fire with a cinnamon stick for a fragrant and delicious treat. As experts in outdoor comfort suggest, hot drinks are essential for staying warm and happy, and a little extra effort with good ingredients makes all the difference.
Hydration and Energy Boosters
Between hiking, setting up camp, and enjoying the occasional cocktail, it’s easy to forget about the most important drink of all: water. Staying properly hydrated is the key to feeling your best on any outdoor adventure. It keeps your energy levels up, helps you think clearly, and prevents headaches and fatigue that can put a damper on your trip. Beyond basic hydration, having a plan for your morning energy kick is just as crucial. A good camping beverage strategy covers all your bases, from morning until night, so you can focus on the fun.
The Importance of Water and Electrolytes
It sounds obvious, but drinking enough water is critical, especially if you’re active during the day or enjoying alcoholic beverages at night. To give your hydration a hand, consider packing some electrolyte powder packets. They’re lightweight, easy to pack, and can quickly help you rehydrate and replenish what you’ve lost through sweat. A drink like Gatorade or a similar sports drink can also help you get your energy back after a long hike, ensuring you feel great for the entire trip.
The Morning Coffee Ritual
For many campers, the morning coffee ritual is a sacred part of the experience. There’s something special about brewing a fresh cup while the campsite is still quiet and the morning air is crisp. Whether you prefer a pour-over, an AeroPress, or a classic percolator, that first sip of coffee sets a positive tone for the day ahead. And if you’re looking to make your weekend camping coffee a little more indulgent, a small splash of Mash & Mallow S’mores Whiskey creates a delicious, warming drink that’s perfect for a slow morning.
How to Make These Recipes Work for You
Camping is all about sharing good times with good people, and that includes making sure everyone has a delicious drink in hand. Catering to different dietary needs doesn’t have to be complicated. With a few smart adjustments, you can easily whip up cocktails and mocktails that everyone in your crew can enjoy. A little planning goes a long way in making your campsite bar feel inclusive and fun for all. Whether you’re dealing with non-drinkers, health-conscious friends, or food allergies, these simple tips will help you adapt any recipe.
How to Batch Amazing Mocktails
The easiest way to serve a crowd with mixed preferences is to prepare a large batch of the non-alcoholic base. Think of it as a “choose your own adventure” drink station. Mix the juices, syrups, and garnishes in a large pitcher or drink dispenser. This allows your friends who aren’t drinking to enjoy a fantastic, crafted beverage, while others can add a splash of Mash & Mallow S’mores Whiskey to their own cups. This works perfectly for drinks like a spiced apple cider or a rich hot chocolate base—both are delicious on their own and even better with a shot of whiskey. For more inspiration, you can find tons of great non-alcoholic drink recipes online.
Your Guide to Low-Sugar & Low-Calorie Sips
Making a lighter cocktail is all about using fresh, high-quality ingredients. Instead of relying on sugary, pre-made mixes, try making your own with fresh-squeezed juice. For example, you can make a fantastic margarita with just fresh lime juice and a touch of agave nectar instead of a high-fructose mix. This swap not only cuts down on sugar but also makes the drink taste so much better. You can also use sparkling water or club soda in place of tonic or soda to reduce calories without sacrificing fizz. Using natural sweeteners and fresh fruit will give you vibrant flavor that everyone can feel good about.
Gluten-Free and Allergy-Friendly Swaps
When you’re planning the menu, it’s always a good idea to check in with your friends about any allergies or sensitivities. While most distilled spirits like whiskey are considered gluten-free, mixers and other ingredients can sometimes contain hidden allergens. Pre-made syrups and cocktail mixes are common culprits, so opting for fresh, simple ingredients is always a safer bet. Reading labels is key. By being mindful and choosing your ingredients carefully, you can ensure everyone has a safe and enjoyable drink around the campfire.
How to Serve Cocktails at Your Campsite (Without the Fuss)
Once you’ve safely transported your pre-mixed drinks, the final step is serving them. You don’t need a full bar cart to enjoy a great cocktail in the great outdoors. The key is to keep things simple, smart, and focused on the experience. Think less about intricate garnishes and more about practical ways to pour a delicious, chilled drink with minimal fuss. This isn’t the time for fancy shaking techniques or delicate glassware; it’s about efficiency and enjoyment.
A little planning goes a long way. Instead of packing fragile glasses, opt for durable, reusable cups. Insulated tumblers are fantastic because they keep your drinks cold and your hands comfortable, no matter how warm it gets by the fire. It’s also smart to designate a small, flat surface—like the top of a cooler or a small folding table—as your “bar” to keep things organized and prevent spills. Consider the weather, too. If you’re camping in a humid climate, you might even pack a few silica gel packs near your bottles to absorb moisture and protect the labels and seals. Remember, the goal is to relax and enjoy your surroundings, and having a straightforward serving plan lets you do just that. With the right setup, you can pour a perfect campfire cocktail in seconds and get right back to stargazing.
Master the Simple ‘Batch and Pour’ Method
The easiest way to serve cocktails at a campsite is to have them ready to go. Before you even leave home, mix a large batch of your chosen recipe in a large, sealable pitcher or jug. This means you won’t be stuck measuring and mixing ingredients in the dark with only a headlamp for light. When it’s time for a drink, all you have to do is open your container, pour over ice (if you have it), and enjoy. This approach works especially well for our S’mores Whiskey cocktails, which can be easily batched for a group.
Why Multi-Purpose Gear is Your Best Friend
When you’re camping, every item in your pack should earn its spot. A large, wide-mouthed mason jar is a perfect example of smart packing. It can serve as a shaker for any last-minute additions, a pitcher for serving your group, and even a drinking glass in a pinch. Similarly, an insulated thermos is a game-changer. It not only keeps your cocktails cold for hours but also protects them from the elements and prevents any accidental spills in your pack.
Simple, Packable Garnishes for the Final Touch
Just because you’re camping doesn’t mean you have to skip the finishing touches. You just have to be strategic. Instead of delicate herbs, pack sturdy garnishes like citrus wedges (lemon, lime, orange) or a small bag of dehydrated fruit slices. For a Mash & Mallow cocktail, a simple toasted marshmallow on a stick is the perfect, on-theme garnish that requires no extra packing space. It adds a bit of fun and flavor without any hassle.
Set Up a Simple DIY Cocktail Bar
You don’t need a fancy setup to create a functional cocktail station at your campsite. Designate a flat, stable surface—the top of your cooler or a small camp table works perfectly—as your official bar. This keeps everything organized and off the ground. Lay out your essentials from your camping cocktail kit: a durable shaker (a large mason jar with a tight lid is my go-to multi-tool), your pre-batched drinks, and a few sturdy, insulated tumblers for serving. Having everything in one spot makes it easy for everyone to grab a drink without fumbling through bags. It’s all about creating a simple, self-serve system so you can spend less time playing bartender and more time enjoying the fire.
Planning Your Perfect Camping Cocktail Menu
A little planning before you head out can make the difference between fumbling with bottles in the dark and sipping a perfect cocktail by the fire. The goal is to spend more time relaxing and less time playing bartender for your friends. Thinking through your menu, gear, and prep strategy at home ensures you have everything you need for a smooth, delicious experience once you’re settled at the campsite. It’s all about working smarter, not harder, so you can get right to the good part: enjoying the great outdoors with a great drink in hand.
Why Simple is Always Better
This isn’t the time to test out that complicated, 10-ingredient tiki drink. When you’re camping, simplicity is your best friend. Stick to two or three great options that are easy to assemble. Think about recipes with overlapping ingredients to lighten your load. A bottle of Mash & Mallow, for example, works beautifully in a simple S’mores Old Fashioned and can also be mixed with just cola or ginger ale. This gives everyone options without requiring you to pack an entire bar. Choosing easy recipes that appeal to a wide range of tastes ensures everyone will find something they love.
Use the 2-1-1 Formula for Easy Sours
One of the best tricks for effortless campsite cocktails is memorizing the 2-1-1 formula. It’s a classic bartender’s ratio for making perfectly balanced sour drinks, and it’s incredibly easy to remember. The rule is simple: 2 parts spirit, 1 part sweet, and 1 part sour. This framework is the secret behind classics like the whiskey sour. For a fun campfire twist, you could use our S’mores Whiskey as your spirit, fresh lemon juice for the sour component, and a simple syrup for the sweet. The beauty of this formula is its flexibility; you can adjust the amounts to make it stronger or less sweet. It’s a fantastic starting point that makes you look like a pro, even when your bar is a picnic table. If you want to learn more about building your own drinks with this method, Kowalski’s Markets has a great guide on custom cocktail recipes.
Plan Around Your Gear and Ingredients
Weight and space are everything when you’re packing for a trip. Leave the heavy glass bottles at home and transfer your spirits and mixers into lightweight, shatterproof containers like flasks or reusable plastic bottles. A large mason jar with a secure lid is one of the most useful tools you can bring; it doubles as a cocktail shaker and a storage container for your pre-mixed drinks. For garnishes, think durable. Instead of fresh mint that will wilt, pack a few cinnamon sticks or some dried orange slices to add that finishing touch without the fuss.
Prep as Much as Possible at Home
Your future self will thank you for doing a little prep work in your kitchen. Pre-mixing, or batching, your cocktails is the ultimate camping hack. For most recipes, you can combine all the non-carbonated ingredients into a single container before you even leave the house. For example, you can find several cocktail recipes on our site that are perfect for batching. Just mix the base ingredients at home, and when you get to the campsite, all that’s left to do is pour over ice and add any bubbly toppers like soda or tonic water. It’s an incredibly simple step that saves a ton of time and effort.
Avoid These Common Camping Cocktail Mistakes
You’ve put in the effort to batch a delicious cocktail, and the last thing you want is for it to spill, spoil, or just not taste right by the time you reach the campfire. A little planning goes a long way in making sure your drinks are as amazing as you intended. Here are a few common slip-ups to watch out for.
Why You Should Always Ditch the Glass
It might be tempting to pack that original bottle of Mash & Mallow, but glass is your enemy in the backcountry. It’s heavy, bulky, and can easily break, leaving you with a dangerous mess and a whiskey-soaked sleeping bag. Trust me, no one wants that. Instead of risking it, transfer your spirits and batched cocktails into durable, lightweight containers. Plastic flasks, stainless steel bottles, and Nalgene-style jugs are all excellent for packing alcohol safely. This simple swap prevents breakage and lightens your load, making the hike to the campsite a little easier.
Don’t Let Your Drinks Get Warm
After a day of hiking or setting up camp, a lukewarm cocktail is a major letdown. Your standard water bottle won’t do the trick here. The key to a refreshing drink is using the right container to keep it cold. An insulated thermos is your best friend for pre-chilled cocktails, keeping them at the perfect temperature for hours. For an extra-cold drink, fill your thermos with ice water for a few minutes to chill the inside before pouring your cocktail in. This simple step ensures your first sip is as crisp and cool as it should be.
Always, Always Secure Your Lids
A leaky container can ruin your gear, waste your cocktail, and attract unwanted critters. Before you go, make sure every bottle, flask, or pitcher you pack has a completely secure, leak-proof lid. It’s a great idea to test your containers at home with water before committing your precious cocktail to them. For larger batches, you can find great sealable pitchers designed for transport. As an extra precaution, pack your cocktail containers in a separate dry bag or a sealed plastic bag to contain any potential spills.
Remember to Account for the Elements
The great outdoors is unpredictable, and it’s smart to pack with that in mind. Extreme heat can cause ingredients like fruit juice to spoil faster, while high humidity can make everything feel a bit sticky. When you pack, always consider the weather conditions of your destination. Store your cocktails in a well-insulated cooler, away from direct sunlight. If you’re heading somewhere particularly damp, keeping your supplies in a dry bag will protect them from moisture and ensure your fireside sips are perfect when you’re ready to relax.
Related Articles
- 12 Easy Camping Cocktail Recipes for Your Next Trip
- 10 Easy Camping Cocktails for Your Next Trip
- The Ultimate Guide to Camping Drinks for Adults
Frequently Asked Questions
What’s the easiest way to make a great camping cocktail if I’m short on time? Honestly, the simplest approach is often the best. If you want zero prep work, just pour our S’mores Whiskey over a large ice cube in a tumbler. It’s delicious on its own. For a two-ingredient option, mix the whiskey with cola or ginger ale right at the campsite. You get a fantastic drink in seconds without any pre-batching required.
Is it okay to pre-mix cocktails with carbonated ingredients like soda or ginger beer? I would advise against it. If you mix in your bubbly ingredients at home, they will be completely flat by the time you’re ready to drink. For the best taste and fizz, you should batch all the non-carbonated parts of your cocktail—like the whiskey, juice, and syrups—and pack your soda or tonic water separately. Add it right before you serve.
How long will my batched cocktails with fresh juice actually stay good in a cooler? For cocktails containing fresh citrus juice, you should plan to drink them within two to three days. While they will still be safe to drink after that, the fresh juice will start to lose its bright, zesty flavor. For the best-tasting drink, enjoy any citrus-based mixes earlier in your trip and keep them well-chilled.
What’s the best all-purpose container for mixing, transporting, and serving? My go-to is a large mason jar with a tight-fitting lid. It’s incredibly versatile and cuts down on the gear you need to pack. You can use it at home to measure and mix your cocktail, seal it up for transport, and then use it as a small pitcher to serve from at the campsite. In a pinch, it even works as a rustic drinking glass.
Besides cocktails, what are some other simple ways to enjoy Mash & Mallow while camping? It’s fantastic for more than just cocktails. One of my favorite things to do on a chilly morning is to add a splash to my camp coffee for an instant s’mores latte. It’s also incredible in hot chocolate. Just make your hot cocoa as you normally would over the fire and stir in a shot of whiskey for a rich, warming adult treat.
